


Designing MVPs from scratch can be done fairly quickly nowadays, but can they also be done well in short amounts of time? Absolutely—and this precisely what this article is about.
Today, we'll take a look at the design sprint methodology and how it can help startups build MVP by following a series of simple rules and a tight schedule.
Below, you’ll find an overview of the traditional design sprint framework, as well as an updated structure we use at the Adam Fard Studio.
Let’s dive right in, shall we?
What’s an MVP in Design?
MVP stands for Minimum Viable Product—a very early form of a product that has but a set of core features to satisfy the users’ most basic needs. The idea here is to create something useful with the smallest possible investment of time and money.
An important premise behind creating MVPs is providing an environment where user behavior can be tested and documented. Rather than asking your users about their theoretical preferences, offering them an interface to interact with will yield more actionable insights to fuel future product iterations.
What’s an MVP Design Sprint?
Design sprint is a concept coined by Jake Knapp and Google Ventures that aims to validate, prototype, and test ideas via design in a short amount of time—five days, to be precise. The product of such sprints is MVPs rather than finished products.
"The goal of a design sprint is not to spit out a perfect solution at the end of one week, but to get feedback on one or two many possible solutions."
– Tim Hoffer, Designer, Design Sprint Facilitation
This methodology aims to create a low-risk and high-reward process that will allow organizations and startups to extract more information about their users’ needs and develop products that are fit for the market.
The sprint can generally be divided into five sections:
Section 1: identifying the user problem;
Section 2: defining the problem;
Section 3: brainstorming solutions and shortlisting the best ones;
Section 4: prototyping the above solutions;
Section 5: testing its viability on the market.
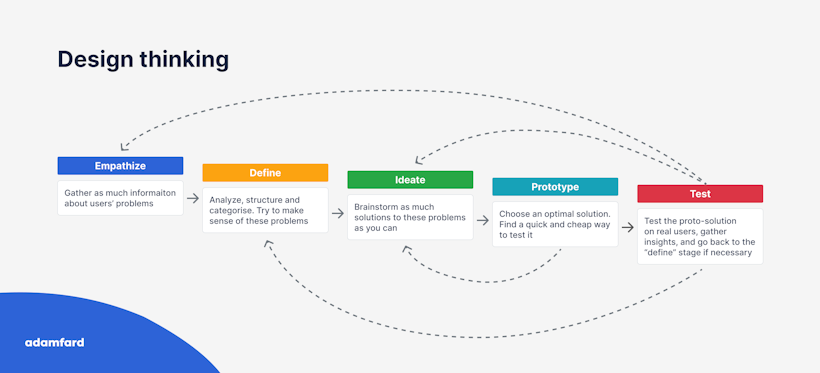
You may have noticed that this structure resembles the Design Thinking framework that consists of the following components:
Empathize—ensure an in-depth understanding of the user;
Define—outline user needs and explore the product’s opportunities for innovation;
Ideate—brainstorm solutions based on the defined problem;
Prototype—create a prototype based on a shortlisted solution;
Test—allow users to interact with your prototype and document their experience;


One of the core differences between the two is that Design Sprints are predominantly a problem-solving framework. That implies that before starting a sprint, we should have a clear challenge in mind. On top of being a problem-solving methodology, Design Thinking is also a problem definition framework—it allows teams to explore solutions in a broader, less targeted way by leveraging empathy.
Another critical difference between the two is their purpose. Just as Design Thinking allows to solve a broader spectrum of issues, it also has a broader scope. In contrast, design sprints have a clear, well-defined target.
So think of it this way—Design Thinking is a philosophy, and design sprints are a practical tool for validation that runs on it.
How Much Does it Take?
Fundamentally, it depends on the scope. The original design spring calls for a five-day process, but we don’t think that you should be limited to that.
Here’s a brief overview of the original five-day framework:
Monday—start by planning the week and establishing a long-term goal and the problem you’re planning to solve—it should be both challenging and manageable;
Tuesday—review existing solutions and explore ways to refine and improve them;
Wednesday—the previous day resulted in a wide array of opportunities. It’s time to find the most viable ones by critiquing and analyzing each one. This should provide you with a storyboard;
Thursday—turn yesterday’s storyboard into a prototype;
Friday—select a group of users to test your prototypes with—that will provide you with a good understanding of the improvements your product needs to satisfy their needs;


While we don’t believe the original structure to be flawed in any way, in our experience, four weeks is a timeframe that provides for a more thorough sprint. This amount of time should be sufficient to deliver an MVP for a medium-complexity product. However, if you’re dealing with a much more intricate project with more ins and outs, feel free to double that time.
What Goes Into an MVP Design Sprint?
Let’s take a closer look at how we like to structure our design sprints.


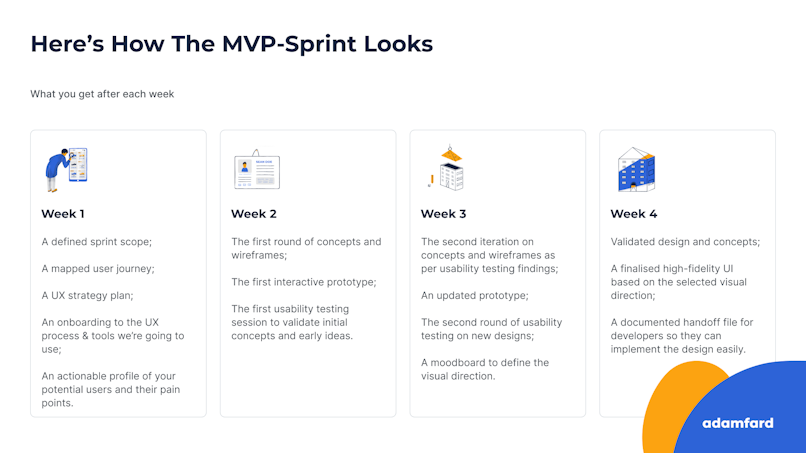
Week 1
1.1 Define the sprint scope. This is the foundation of your sprint, and it will ultimately define its efficiency. According to a study published by CB Insights, over 40% of startups fail because of a lack of market need. The goal of an MVP is to validate market fitness.
1.2 Focus on the features that embody your unique selling proposition (USP). There is a variety of questions that will help you assess the quality of your USP and calibrate it to the existing market. Here are a few of them:
What is the most important problem that our product aims to solve?
Who are the people experiencing this problem? What do they have in common?
Is this problem substantial enough to warrant a new product?
How do people address this problem without the product we’ve set out to create?
1.3 Define necessary features (e.g., sign-up flow, onboarding, etc.). As you go through the questions above, you’ll establish a wide array of things your product could do, but the goal here is to define what it must do.
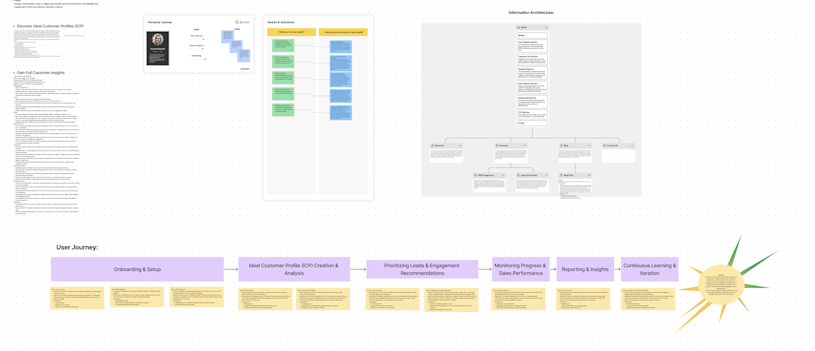
1.4 Map the user flow and journey with regard to the features you’ve outlined. Use the essential features above to create a meaningful path that users will take throughout your future product;


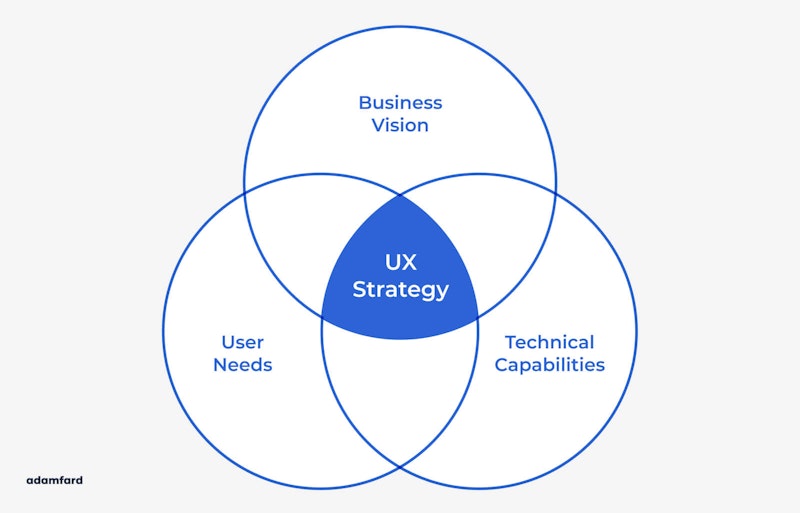
1.5 Define your UX strategy. A UX strategy is a document that provides an in-depth view of the qualities of a user’s experience with your brand. It should take into account your organization’s overarching objectives and marry them with the tools UX has to offer in achieving them.
Your startup might prioritize early adoption, securing adequate retention, and other central goals. It’s now the design team's job to make sure the UX works toward these goals as well.


1.6 Achieve team-wide alignment on the tools and processes. The whole team should have a good understanding of the goals you’ve set out to achieve, the design tools that will be used to do so, the frequency of calls and meetings, how accesses and credentials will be shared, and other important formalities.
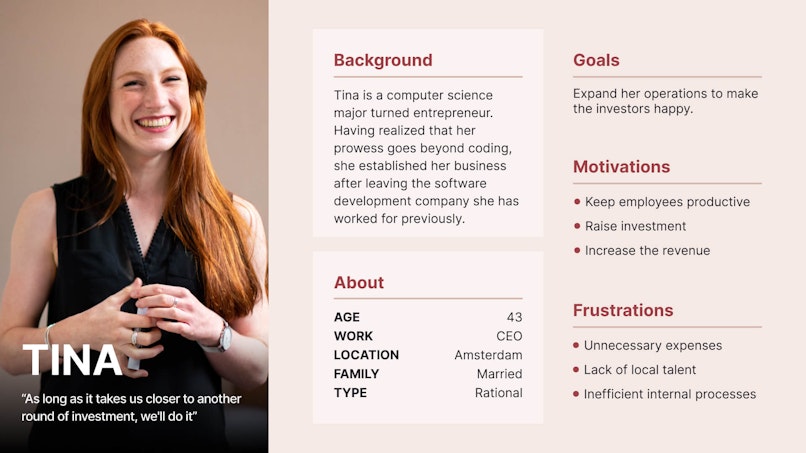
1.7 Document your user persona. This is when you consolidate all available intel on your users, their goals, pains, background, and so forth.

Week 2
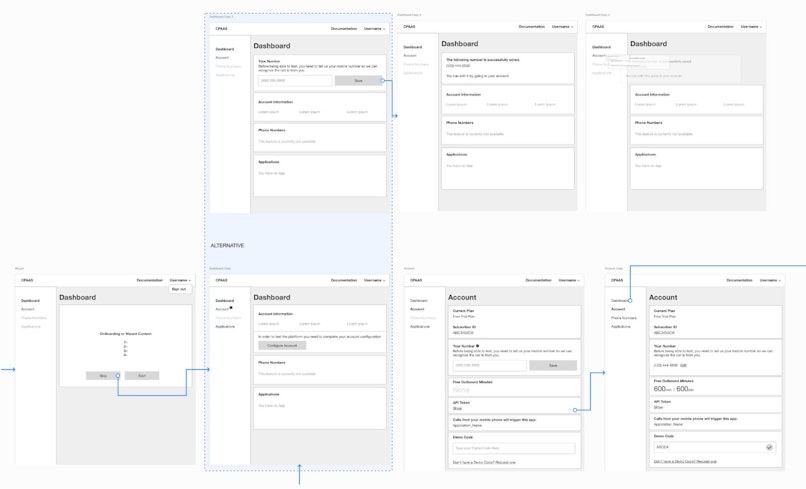
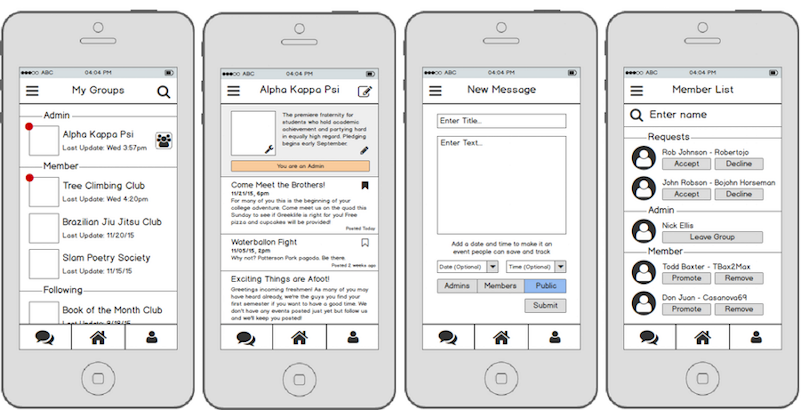
2.1 Run the first rounds of concepts and wireframes. Just like it is the case with Design Thinking, every phase of the design sprint methodology is tightly interconnected with prior and future steps. Now that we’ve established the most important features and the guiding UX strategy, we can look into execution.
During this step, designers can start creating some rough sketches and low-fidelity wireframes that will be refined and elevated afterward.


2.2 Start prototyping. Now that you’ve developed some key tangible designs, it’s time to make them clickable and interactive. There’s a variety of tools that can help you with that. We like to use Figma for these purposes, but there are also tools like Figma, Sketch, etc.


2.3 Run the first usability tests to validate initial assumptions. The reason you would create clickable prototypes in the first place is to test them with real users. Similarly, they allow you to establish whether they communicate your design vision accurately. Make sure to recruit at least 5 users, since this is an optimal number to uncover the most insights with the least effort. Aside from that, they’re a valuable asset when it comes to persuading potential investors.


Week 3
3.1 Iterate on the wireframes based on the usability test results. After you’ve collected some meaningful feedback from your users, you have a lot of actionable insight that you can incorporate into your product.


3.2 Update your prototypes as well. Once you’ve updated your wireframes, you can start making adjustments to your prototypes.
3.3 Run the second round of usability testing. Your goal is to validate your improved design with your users. Make sure that users no longer experience the problems mentioned in the previous test. However, your quest to identify new issues is not over. If your users mention other pressing issues, it’s essential to go back to the drawing board and run an extra prototype iteration.
3.4 Define the visual direction
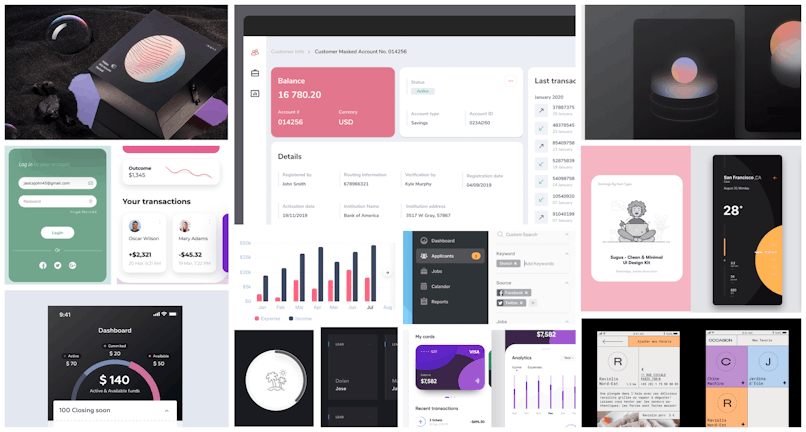
Given that you now have a good understanding of your product’s architecture, it’s time to think about the visual direction as well. Generally, you would want to create a mood board, i.e., a compilation of design references, so that you can pick the patterns and visuals the team likes the most.


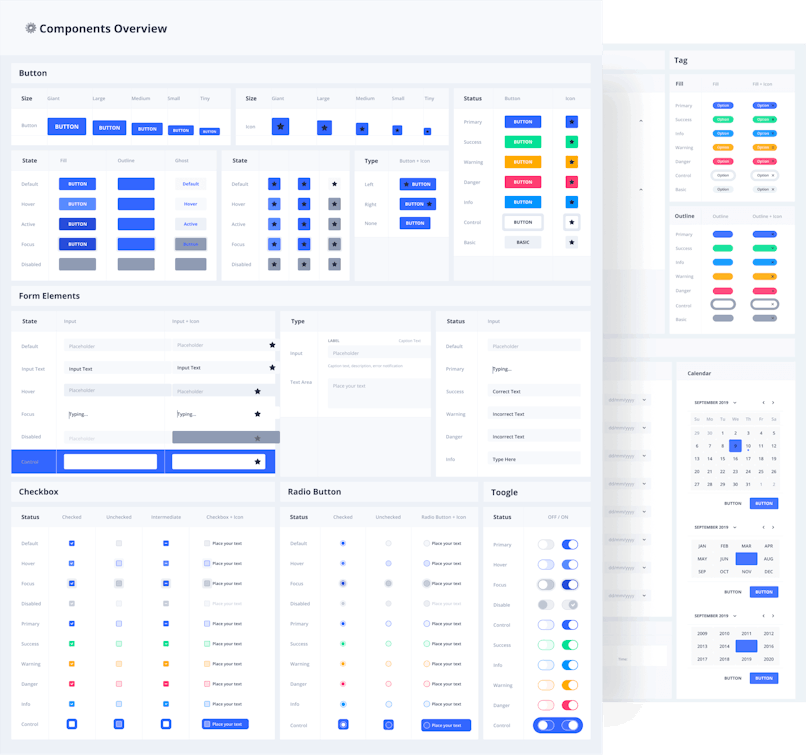
Moodboards are not the only thing you'd need though. Ideally, your visual identity should be documented in a style guide, or in a design system that also includes a style guide.


Week 4
4.1 Give your high-fidelity designs some final touch-ups. Having identified the visual direction and the product’s structure, you can bring these two together and have a fully designed app.
4.2 Prepare the hand-off file for the developer(s). In order to smooth out the process, it’s important to prepare design systems, introduce proper taxonomy, and so forth, so that the design is easy to implement.


Our New 5-day MVP Design Sprint at Adam Fard
Our new MVP sprint helps you research, map, conceive, and visualize your product in only 5 days.
With over a decade of experience in product design, we've refined our process to deliver maximum value in minimal time.
Our expert team has condensed weeks of work into an intensive 5-day sprint, leveraging cutting-edge tools and methodologies.
Need to refine further? No problem.
Our MVP sprints are designed for iteration, allowing you to run multiple sprints after feedback from users, clients, or investors to perfect your product vision and strategy.
Day 1: Kickoff, knowledge transfer and research
Stakeholders interviews
Inputs gathering
Mapping of user flows
Industry research and transfer of knowledge


Day 2: Early Flows and Wireframes
Conception of early flows
Creation of wireframes based on the research


Day 3-4: Further iteration based on stakeholders’ feedback
Fine-tuning and finalizing wireframes
Make flows ready for visual design


Day 5: Transforming wireframes into Hifi designs
Finalizing the app based on the test results


Optional: Recruiting and testing concepts with users
We can help you recruit and test designs with users in a short amount of time
The timeframe will depend on the user's availability and their roles
Average: 1-2 weeks


Meeting and communication:
Day 1: sync workshop 60-90min
Day 2: sync 30min
Day 3: async Slack / Figma
Day 4: async Slack / Figma
Day 5: sync 30min
Optimizing the Testing Phase
The testing phase of the design sprint is one aspect that teams must pay maximum attention to. Let's go over some strategies to enhance the process.
Remote User Testing: Conducting Effective Remote Tests
Remote user testing has become increasingly popular, especially in today's remote-first setting. It allows you to gather valuable insights from users located anywhere in the world. Here are some tips for conducting effective remote user testing during design sprints:
Choose the Right Tool
We have written a comprehensive article on new innovative and AI-powered tools for user research, however, below are a few of them:
UserTesting: Offers a comprehensive platform for conducting unmoderated and moderated tests.
Lookback: Provides flexible tools for screen recording, user surveys, and heatmaps.
Maze: Specializes in usability testing and card sorting tasks.
UX Pilot: Offers a range of AI tools for design feedback, including heatmaps and heuristic evaluation.
Create a Clear Test Plan
After choosing the right tools, you have to draw an effective plan on how to achieve your design sprint goals.
Define Your Goals: Clearly articulate what you want to learn from the test.
Develop a Test Script: Outline the tasks and questions you'll ask participants.
Prepare Test Scenarios: Create realistic scenarios that simulate real-world usage.
Recruit the Right Participants
Choosing the wrong participants can affect your entire outcome.
Target Your Ideal User: Identify the specific demographics and behaviors of your target audience.
Consider Screen Recording: If you want to observe user behavior in detail, screen recording can be a valuable tool.
Use Incentives: Offer incentives to attract and motivate participants.
Conduct the Test
To conduct successful tests during design sprints, do the following:
Welcome and Orient Participants: Clearly explain the purpose of the test and how it will be conducted.
Set the Stage: Create a comfortable and distraction-free environment for participants.
Observe and Take Notes: Pay attention to user behavior, verbal cues, and any issues they encounter.
Analyze and Iterate
Finally, carefully analyze whatever data you acquire from the tests. Here are some tips.
Review Recordings and Transcripts: Identify key insights and patterns.
Prioritize Findings: Focus on the most critical issues and opportunities for improvement.
Iterate on Your Design: Incorporate user feedback into your design and conduct further testing as needed.
With these guidelines and the right tools, you can conduct effective remote user testing and learn creative ways to improve your product or service.
A/B Testing: Data-Driven Decision-Making
A/B testing is another powerful technique for comparing two versions of a design to determine which one performs better. Here are some best practices for conducting effective A/B tests:
Set Clear Goals: Define what you want to achieve with your A/B test.
Develop Hypotheses: Formulate specific hypotheses about how the two versions will perform.
Design the Test: Create two versions of your design that differ in one or two key elements.
Choose the Right Metrics: Select the metrics that will help you measure the success of your test.
Run the Test: Collect data on user behavior and performance metrics.
Analyze the Results: Determine which version performed better and draw conclusions from the data.
Implement the Winning Version: Make the necessary changes to your design based on the results of the test.
Following these best practices can help you make data-driven decisions that improve the performance of your product.
Addressing Challenges and Best Practices in Design Sprints
While design sprints offer a powerful framework for rapid innovation, you must address potential challenges and adopt best practices if your goal is to maximize their effectiveness.
With knowledge of the common pitfalls and proven strategies to tackle them, it's easier for teams to overcome obstacles and achieve outstanding results.
Common Pitfalls and How to Avoid Them
Here's how teams can ensure the success of their sprints.
Scope Creep:
Solution: Define a clear scope and stick to it. Use techniques like MoSCoW prioritization to focus on the most critical features.
Lack of Team Buy-in:
Solution: Involve team members from the beginning and ensure they understand the goals of the sprint. Foster a collaborative environment and encourage open communication.
Insufficient User Research:
Solution: Allocate adequate time for user research and involve users throughout the sprint. Conduct interviews, surveys, and usability tests to gain valuable insights.
Poor Time Management:
Solution: Create a detailed schedule and stick to it. Use time-boxing techniques to allocate specific timeframes for each activity.
Best Practices for Successful Design Sprints
Now let's go over some essential best practices to adopt that can drive innovation and efficiency, maximizing the effectiveness of design sprints.
Strong Team Composition:
Diverse Skills: Assemble a team with a diverse range of skills, including designers, developers, product managers, and stakeholders.
Clear Roles: Define clear roles and responsibilities for each team member.
Effective Facilitation:
Experienced Facilitator: A skilled facilitator can guide the team through the process and keep discussions focused.
Active Participation: Encourage everyone to participate and share their ideas.
Continuous Iteration:
Iterative Design: Embrace a mindset of continuous improvement. Test early and often to refine your designs.
Agile Approach: Use agile methodologies to adapt to changing requirements and priorities.
Celebrate Successes:
Positive Reinforcement: Recognize and reward team members for their contributions.
Learn from Failures: Use failures as opportunities to learn and improve.


Need help setting up an effective UX team? You can book a free consultation with our experts today.
Scaling Design Sprints
Scaling design sprints to larger teams and complex projects can be challenging. Looking for some strategies to overcome them? Read below.
Break Down the Problem:
Divide and Conquer: Break down large projects into smaller, more manageable sprints.
Parallel Sprints: Run multiple sprints simultaneously to accelerate the process.
Distributed Teams:
Remote Collaboration Tools: Use tools like Zoom, Miro, and Slack to facilitate communication and collaboration.
Clear Communication: Establish clear communication channels and expectations.
Scaling User Research:
Remote User Testing: Leverage remote user testing tools to gather insights from a wider range of users.
Surveys and Questionnaires: Use online surveys and questionnaires to collect quantitative data.
Adapting the Sprint Framework:
Adjust the sprint framework to fit the specific needs of your project.
Prioritizing Activities: Focus on the most critical activities and eliminate unnecessary steps.
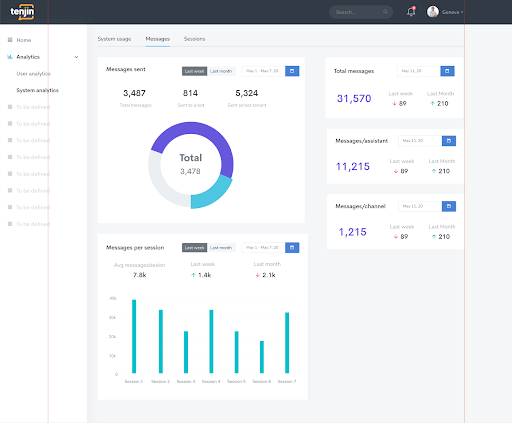
Case Study of a Successful MVP Design Sprint: Biomni
Biomni’s goal was to transform traditional request management systems with their Tenjin project. Through a Minimum Viable Product (MVP) approach and the principles discussed in this article, our team at Adam Fard was able to rapidly design and deploy a valuable product. Continuous iteration and data-driven insights allowed us to enhance Tenjin with advanced features like natural language processing and gamification. This resulted in significant improvement in user experience, increased efficiency, and overall productivity.
Key Impacts and Outcomes:
Enhanced Efficiency: Streamlined workflows and reduced response times.
Improved User Experience: Intuitive interface and personalized interactions.
Increased Productivity: Automated routine tasks and empowered users.
Data-Driven Decision Making: Informed product decisions based on user behavior.
Successful Product Launch: Timely and well-received product launch.


Do you need help creating an MVP? Book a free consultation with our experts today to discuss your needs.
The Pitfalls of Designing an MVP
Like all things in life, MVPs have their pros and cons. Therefore, it’s important to mention that there’s a wide array of things we need to be mindful of when designing them. Here are a few of them:
Visuals Over Content and Growth
A common pitfall modern startups are subject to is excessive focus on visuals. While they are pretty important for design, their primary purpose is to build trust with first-time users, not be the star of the show.
The focus of your MVP should revolve around the value users are provided via content and careful tailoring of the product’s user experience.
"Lean" Doesn’t Mean No Research
Trying to stay lean is often misconstrued as diving headfirst into the design and development process and figuring out everything else along the way. That’s only partly true. Design sprints demand a fair share of research in order to be successful. Working on an MVP implies sitting on a wealth of information that sheds light on the users’ and the market’s needs.
Failing to ensure that will result in developing a product that people just don’t need or want. At Adam Fard Studio, we always have a dedicated researcher on our projects. In our experience, it saves up to 50% time otherwise spent on needless iterations.
Narrow Skillset
UX and UI designers are gradually becoming an indispensable part of a startup’s core team. While choosing to have a UX specialist as part of your crew is certainly laudable, delegating this broad field of work to a single person can be too much to handle. This can be an issue of time and expertise.


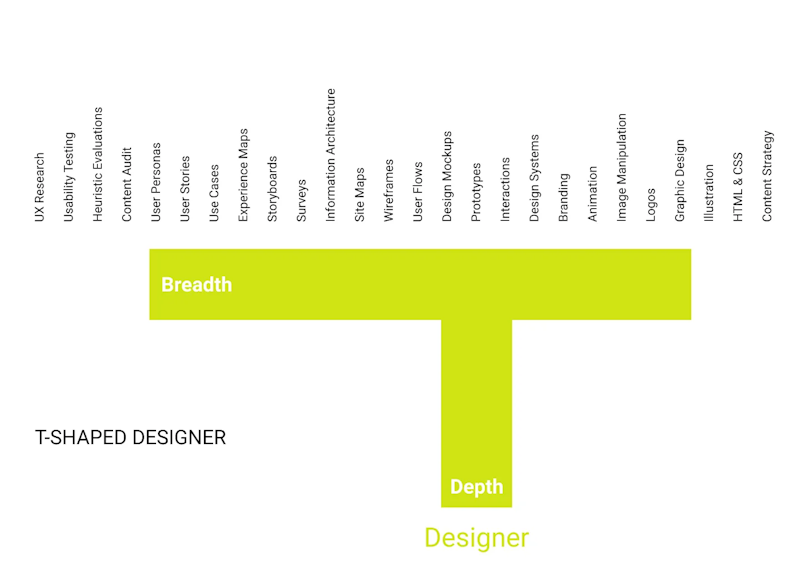
Here's an example of a T-shaped design professional that covers a large area on a surface level, and specializes deeply in just one field. | Source
Make sure to hire designers that specialize in your particular field or, at the very least, have a good understanding thereof. Creatives that have worked exclusively with e-Commerce might have a hard time quickly transitioning into MedTech, or other niches, especially if they’re the only designer on deck. Industry expertise aside, it's nearly impossible to find one person who can do expert interviews, research, UI, etc. all at the same time.
Poor Choice of Features & Feature Overload
It’s very hard to overstate the importance of good feature prioritization. Startups often make one of two mistakes—they either choose their features poorly or just throw a bunch of them in, hoping to entice their users with quantity. Needless to say, both of these scenarios aren’t conducive to a high-quality product.
Fortunately, frameworks like KANO and MoSCoW will allow you to find the most suitable features that will also be in line with your unique value proposition. Both will enable you to differentiate between the things that your users deem basic and the ones that will excite and impress them. Let’s take a closer look.
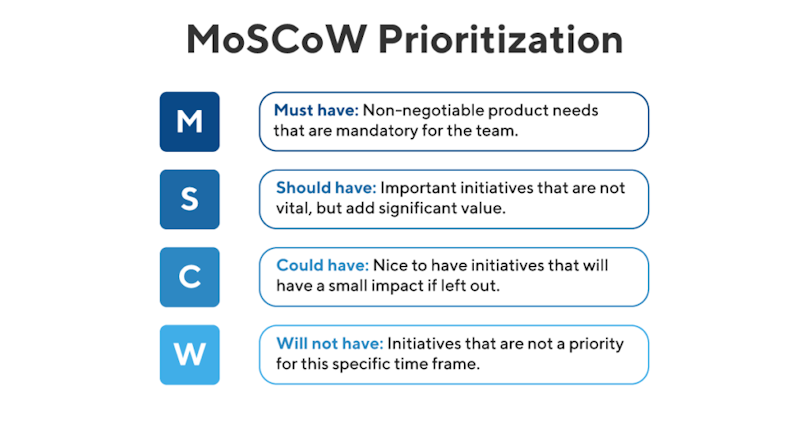
The MoSCoW framework is especially useful when dealing with very short deadlines. The point of this method is to consider all features as vital, but differentiate them based on the benefits they can provide and the amount of time it’ll take to develop them. The MoSCow framework has four feature categories:
Must-have;
Should-have;
Could-have;
Won’t have;
By finding the features that will have a greater impact on user satisfaction with the smallest time investment, you will be able to establish what the “must-haves” and “should-haves” of your product are.


The KANO framework was created back in the 1980s. The point here is to categorize user preferences into five different classes:
Basic — features that people take for granted. If delivered appropriately, your users will remain neutral. If delivered poorly, your users will be dissatisfied;
Performance — features that make users satisfied when delivered and dissatisfied when not;
Excitement — features users don’t take for granted. Their existence will excite your users, whereas their absence won’t upset them;
Indifferent — features that do not influence your users’ satisfaction or dissatisfaction. Typically considered unworthy of pursuing;
Reverse — not having these features will have a positive effect while including them in your product will upset them;


However, don’t hesitate to look into other feature prioritization frameworks if you think that these don’t necessarily fit your niche or industry. Feel free to tweak the ones above as well—there’s no method to the madness.
When Do You Start Coding?
Well, you don’t always need to code your MVP. Depending on the kind of product you’re creating, you can use a no-code app builder as you’re designing the solution. If you're interested in learning more about no-code development, be sure to check out the article Why No-Code/Low-Code Is the Future of Development. This article explores the advantages of using no-code tools and why no-code/low-code is considered the future of development.
Some of the most popular no-code app builders include:
Webflow;
Adalo;
Glide;
Backendless;
However, the majority of MVPs will need to be coded. Fortunately, you can get started with the back-end fairly early since it has little impact on the product design. We advise you to consult with an experienced back-end developer to discuss all contingencies.
You can start coding the front end as soon as you’ve validated a piece of the high-fidelity interface. Anything that’s validated is good enough to be coded.
Conclusion
When applied correctly, the design sprint methodology will ensure that your MVP will satisfy user needs and be fit for the market it’s about to enter. Also, don’t hesitate to tweak and experiment with it, especially when it comes to timeframes.
We like to extend the sprint to 4 weeks when dealing with relatively complex products since it allows us to be more thorough and analytical about our decision-making.
We hope you’ve found this to be useful. Good luck and happy designing!


MVP Design Sprint Checklist
Check out our free editable MVP design checklist to design and validate your idea fast and with minimum effort.
DownloadQ&A
How do I create an MVP product?

First, identify the user problem, defining the problem, then brainstorm solutions and prototype them, and test its viability on the market.
Is MVP part of design thinking?
Design thinking is a philosphy at the core of developing an MVP.
What does MVP mean in Agile?
MVP stands for Minimum Viable Product. It's a product development philosophy that focuses on launching a viable product in the shortest amount of time.